Seismic Waves Project:
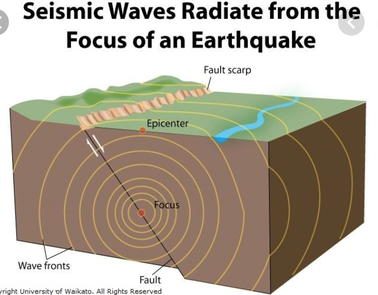
Obtain a Seismic Waves Template from your teacher or make your own copy (click here). An earthquakes anatomy is pictured below. Remember that earthquakes typically develop on transform plate boundaries, when two plates are moving against each other. The earthquake occurs below Earth's surface in the crust. The point where the earthquake is generated is called the focus. The point on Earth's surface directly above the focus is called the epicenter. Seismic waves (S and P waves) are vibrations sent out from the focus in a circular manner when an earthquake is generated. What we feel on from an Earthquake are the seismic waves/vibrations.
Obtain a Seismic Waves Template from your teacher or make your own copy (click here). An earthquakes anatomy is pictured below. Remember that earthquakes typically develop on transform plate boundaries, when two plates are moving against each other. The earthquake occurs below Earth's surface in the crust. The point where the earthquake is generated is called the focus. The point on Earth's surface directly above the focus is called the epicenter. Seismic waves (S and P waves) are vibrations sent out from the focus in a circular manner when an earthquake is generated. What we feel on from an Earthquake are the seismic waves/vibrations.
A seismograph (click here) is a machine in seismograph stations that detects seismic waves from earthquakes. A seismogram is the actual print out from a seismogram (click here). There are various seismograph stations (click here) around the globe. P waves are the faster than S waves and get to the seismograph stations first. The lag time between the P and S waves can tell a seismograph station how far away the epicenter was located.
Part 1: In this part, you will see the difference in speed of S and P waves and then construct your own S-P Wave Time Travel Graph. Choose a team of four and assign each person a responsibility below. Each Seismograph stations will need both a stopwatch (use your cell phone) and pencil. You will take your team out to the football field and place yourself on your designated location:
Pretend the epicenter of an earthquake is located on the 0-Yard Line. See how fast the S-wave moves. The seismic wave person (Person #4) will WALK from the 0-Yard line to the 30-Yard line. Each seismograph station will time how long it takes the S wave to reach their station in seconds (s). Record data on template. Repeat two more times for a total of three trials. Calculate the average of the three trials.
Once again, pretend the epicenter of an earthquake is located on the 0-Yard line. Now see how fast P-wave travels. The seismic wave person (Person #4) will RUN from the 0-Yard line to the 30-yard line. Each seismograph station will time how long it takes the wave to reach their station in seconds (s). Record data. Repeat two more times for a total of three trials. Calculate the average of the three trials. Once finished, take photo of Part 1 Tables and upload in performance task. Shrink down to a reasonable size. Once finished, answer questions below.
1. Why did you average the three measurements at each distance?
2. If you pick any point on your Time-Travel Curve that you have constructed for the walking and running time, what does that point represent?
3. How does running and walking represent S and P waves?
4. How do you think scientists use P and S waves to determine the epicenter of earthquakes?
Obtain a sheet of graph paper or print a copy for yourself (click here). Now plot the S-Wave (Walk) and P-Wave (Run) average times at each distance (0, 10, 20, and 30-Yard Line) on the graph. This will be your time-travel graph. Once finished plotting the data, draw a straight connecting your data points for the S and P waves. Include a main title, y-Title (units included), and x-title (units included). Also color the S and P lines a different color and create a key. Once finished, take photo of completed graph and upload in performance task. Shrink down to a reasonable size.
Part 2:
Obtain a ruler and compass from the teacher! In this part, you will find the epicenter using triangulation when the distance of the epicenter from three seismograph stations is already calculated for you. Use the Finding Epicenter Article (click here) to learn how to perform triangulation. In the article you learned that seismologists determine the distance to the earthquake epicenter using the difference between S and P wave arrival times at seismograph stations. To locate the epicenter of the earthquake, seismologists (scientists that study earthquakes) use the distance data from THREE different seismograph stations and then draw circles representing the distance of the epicenter from each station in all directions. Where they intersect, that’s the epicenter. In this example questions, an earthquake was recorded at Stations, A, B, and C shown below:
Station A reported that the epicenter of the quake was 1500 km from the station.
Station B reported that the epicenter of the quake was 1250 km from the station.
Station C reported that the epicenter of the quake was 3250 km from the station.
Using a scale of 1 cm = 500 km, locate and label the epicenter of the earthquake on the Part 2 Template Map. Before doing so, identify how many cm is equivalent to the distance reported from each epicenter in km. For instance, I'll give the first one to you started. If Station A is 1500 km from the epicenter, this would draw a circle using a compass that is 3 cm from Station A. Hint: Sometimes it's easier to use a ruler to measure out the distance and then use the compass to draw a perfect circle. Once finished with Part 2 on your template, take photo of completed work and upload in performance task. Shrink down to a reasonable size.
Part 1: In this part, you will see the difference in speed of S and P waves and then construct your own S-P Wave Time Travel Graph. Choose a team of four and assign each person a responsibility below. Each Seismograph stations will need both a stopwatch (use your cell phone) and pencil. You will take your team out to the football field and place yourself on your designated location:
- Person #1 = Seismograph Station #1 (Located at the 10-Yard Line).
- Person #2 = Seismograph Station #2 (Located at the 20-Yard Line).
- Person #3 = Seismograph Station #3 (Located at the 30-Yard Line).
- Person #4 = Seismic Wave (Starts walking/running at 0-Yard Line).
Pretend the epicenter of an earthquake is located on the 0-Yard Line. See how fast the S-wave moves. The seismic wave person (Person #4) will WALK from the 0-Yard line to the 30-Yard line. Each seismograph station will time how long it takes the S wave to reach their station in seconds (s). Record data on template. Repeat two more times for a total of three trials. Calculate the average of the three trials.
Once again, pretend the epicenter of an earthquake is located on the 0-Yard line. Now see how fast P-wave travels. The seismic wave person (Person #4) will RUN from the 0-Yard line to the 30-yard line. Each seismograph station will time how long it takes the wave to reach their station in seconds (s). Record data. Repeat two more times for a total of three trials. Calculate the average of the three trials. Once finished, take photo of Part 1 Tables and upload in performance task. Shrink down to a reasonable size. Once finished, answer questions below.
1. Why did you average the three measurements at each distance?
2. If you pick any point on your Time-Travel Curve that you have constructed for the walking and running time, what does that point represent?
3. How does running and walking represent S and P waves?
4. How do you think scientists use P and S waves to determine the epicenter of earthquakes?
Obtain a sheet of graph paper or print a copy for yourself (click here). Now plot the S-Wave (Walk) and P-Wave (Run) average times at each distance (0, 10, 20, and 30-Yard Line) on the graph. This will be your time-travel graph. Once finished plotting the data, draw a straight connecting your data points for the S and P waves. Include a main title, y-Title (units included), and x-title (units included). Also color the S and P lines a different color and create a key. Once finished, take photo of completed graph and upload in performance task. Shrink down to a reasonable size.
Part 2:
Obtain a ruler and compass from the teacher! In this part, you will find the epicenter using triangulation when the distance of the epicenter from three seismograph stations is already calculated for you. Use the Finding Epicenter Article (click here) to learn how to perform triangulation. In the article you learned that seismologists determine the distance to the earthquake epicenter using the difference between S and P wave arrival times at seismograph stations. To locate the epicenter of the earthquake, seismologists (scientists that study earthquakes) use the distance data from THREE different seismograph stations and then draw circles representing the distance of the epicenter from each station in all directions. Where they intersect, that’s the epicenter. In this example questions, an earthquake was recorded at Stations, A, B, and C shown below:
Station A reported that the epicenter of the quake was 1500 km from the station.
Station B reported that the epicenter of the quake was 1250 km from the station.
Station C reported that the epicenter of the quake was 3250 km from the station.
Using a scale of 1 cm = 500 km, locate and label the epicenter of the earthquake on the Part 2 Template Map. Before doing so, identify how many cm is equivalent to the distance reported from each epicenter in km. For instance, I'll give the first one to you started. If Station A is 1500 km from the epicenter, this would draw a circle using a compass that is 3 cm from Station A. Hint: Sometimes it's easier to use a ruler to measure out the distance and then use the compass to draw a perfect circle. Once finished with Part 2 on your template, take photo of completed work and upload in performance task. Shrink down to a reasonable size.
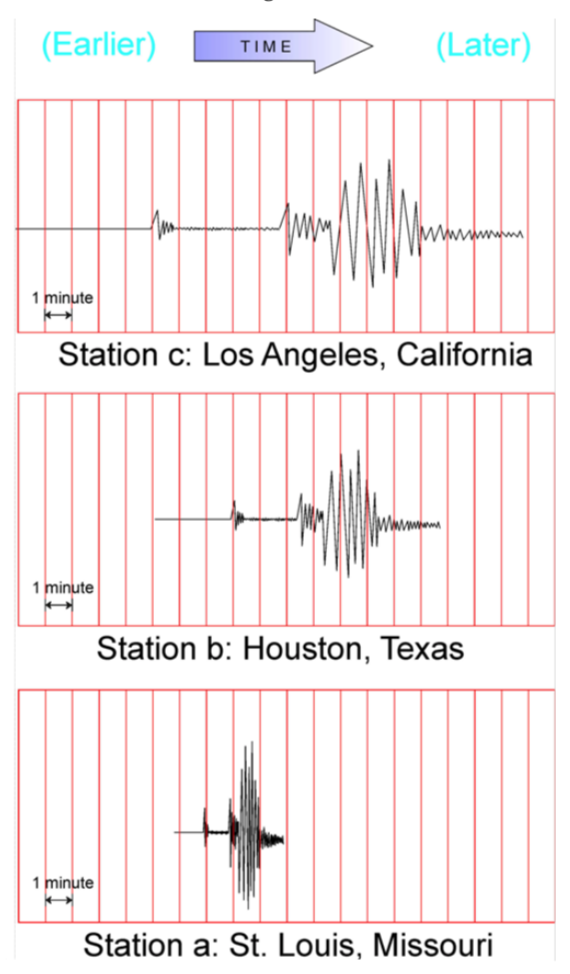
Part 3: Obtain a note card or additional sheet of paper. In this part, you will first analyze the seismograms from three different seismograph stations to determine the distance of the epicenter from each station. You will then use triangulation to determine the epicenter. Before you begin, watch this video on how to perform the wedge method (click here). The wedge methods shows you how to calculate the distance of a station from the epicenter using the lag time between P and S waves. Remember that P waves will always reach a station before the S waves because they are faster. The lag time is then compared against a S-P Travel Chart that scientists use as a gold standard when determining epicenter distance. If you don't watch the video you may be really confused with how to proceed so PLEASE watch! After you watch the video, analyze the three seismograms (pictured below) and use the time travel graph (pictured on your template) to complete the Part 3 Table. Take photo of completed table and upload in your performance task. Shrink down to a reasonable size. Once finished, use the information in the Part 3 table to perform triangulation on the map located on the next page of your template. Be sure to use the distance scale at the bottom of the map. When finished finding and labeling your epicenter, take photo of map and upload in performance task. Shrink down to a reasonable size.
